When it comes to the computer market, the Windows operating system currently dominates it. This is mainly because you can find these computers or laptops in almost every price class. From budget notebooks to high-end ultrabooks, you name it.
But there are times when, despite their popularity, Windows devices run into issues. While this is not a deal breaker, it affects the user experience adversely. This article will cover one of these issues and how you can fix it.
Memory Integrity Not Turning on
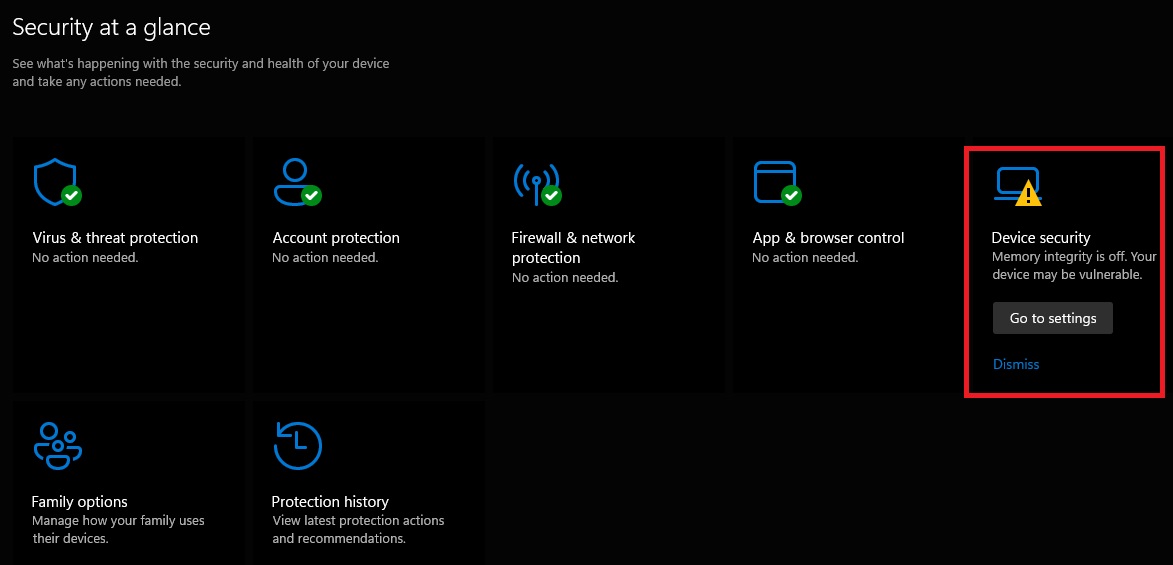
In the past, there have been several complaints about the Memory Integrity feature not turning on in Windows 11. Users state that they get a notification saying, “Memory Integrity is turned off.” The problem is that they cannot seem to turn it back on. The option to do so is usually greyed out, and they get another notification saying that it cannot turn on.
If you are wondering what Memory Integrity is, this feature enhances the security of your device and protects it against malware. All computers running Windows 10 and higher have it, which is turned on by default in Windows 11.
Coming back to the problem, let us first have a look at why exactly it exists. Certain people have pointed out that it is likely because of outdated drivers. Microsoft has recently updated the list of incompatible drivers, resulting in this issue for many users. Other things like corrupt system files and too old hardware can also factor in.
How to Fix Memory Integrity is Off Issue?
Now that you know the problem and what is causing it, it is time to work on fixing it. Follow all the given steps carefully and with precision.
1. Check and update drivers
First of all, you have to be sure whether this is a driver-related problem or not. To do so, open the Settings app and click on Privacy and Security.
On the right-hand side, you will now see Windows Security settings. Click on it and then click on Device Security under Protection Areas.
A new window will open, at the top of which you will see a Core Isolation section. Under that, there will be a highlighted text saying Core Isolation Details. Click on it and then try to turn on Memory Integrity.
Your computer will then check for driver incompatibilities. If you find any, you will be prompted to resolve those and then scan again. Click on the option to review incompatible drivers that you will find just below.
A list of drivers will show up, and after resolving incompatibilities with those, you can turn on Memory Integrity. Now, you have to uninstall these drivers.

How do you uninstall incompatible drivers?
There are two ways to go about this. First, open Device Manager and click View at the top of the window. A drop-down menu will now appear.
Click on the option to show hidden devices from this menu. Now, locate the drivers you saw earlier and right-click on it.
From the set of options that you will now see, uninstall the driver and check if Memory Integrity can be turned on now.

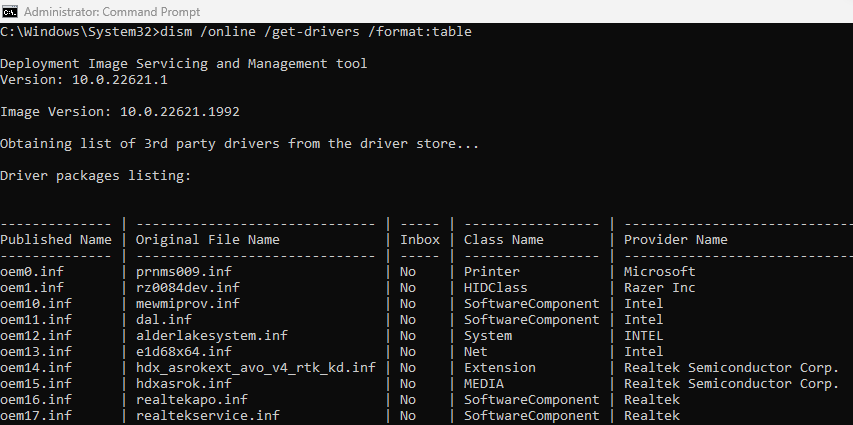
The other way to do this is via Command Prompt. Search for it from the Start menu and run the app with administrator permissions.
In the window that pops up, type the command given below and press the Enter key to run it.
dism /online /get-drivers /format:table
This will enlist all third-party drivers present on your computer. Now, run the command given below to uninstall the drivers you saw earlier in the process.
pnputil /delete-driver <Published Name> /uninstall /force
Ensure you enter the exact name in the above command, or else you may run into further problems in case a helpful driver gets uninstalled. Once done, try enabling Memory Integrity.
Alternatively, you can also use third-party apps to uninstall these drivers. You can find them online, along with the guides on how to use them.
2. Update Windows
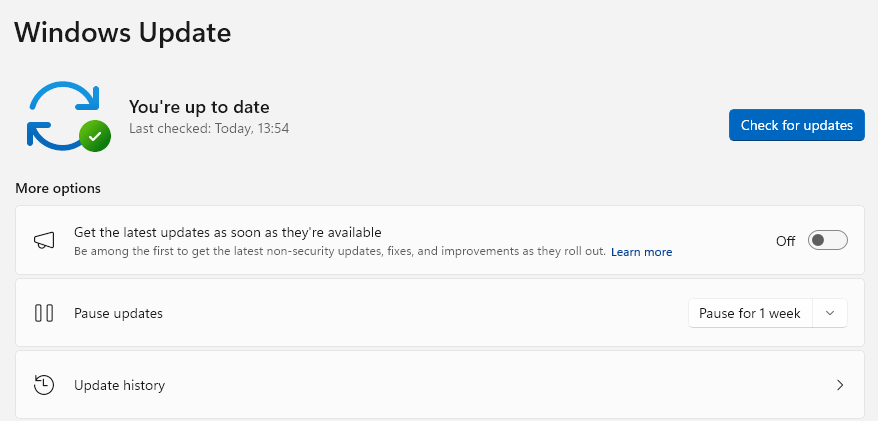
Updates are essential in keeping your device packed with the latest features and ensuring no security loopholes. Open the Settings app and click Windows Update on the right panel, which you will see under your computer’s name.
Now, click on the option to check for updates. If you have paused updates, click on the option to resume and then check for any updates.
If there are any updates, install them. Updating your device can often resolve many issues. Now check if you can toggle on Memory Integrity.
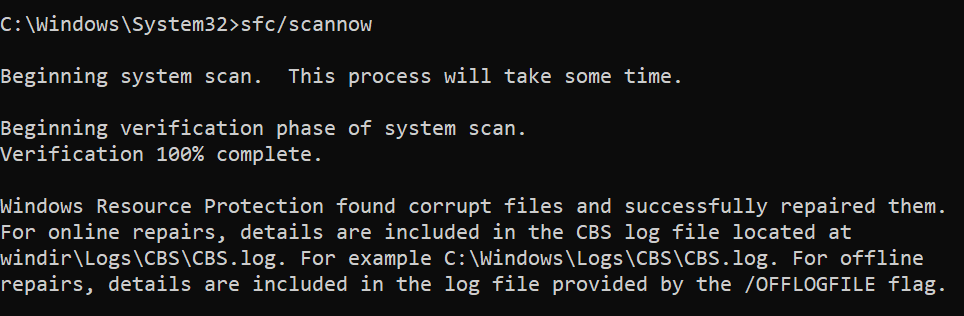
3. Run a System File Checker (SFC) scan
System File Checker is a utility present on Windows 10 and above. Running an SFC scan looks for corrupt system files on your computer and restores them if found.
To run an SFC scan on your device, launch the Command Prompt app with administrator permissions as directed above. Then, run the command given below and wait for a while.
sfc/scannow
Once the scan is done, check if you can enable Memory Integrity.
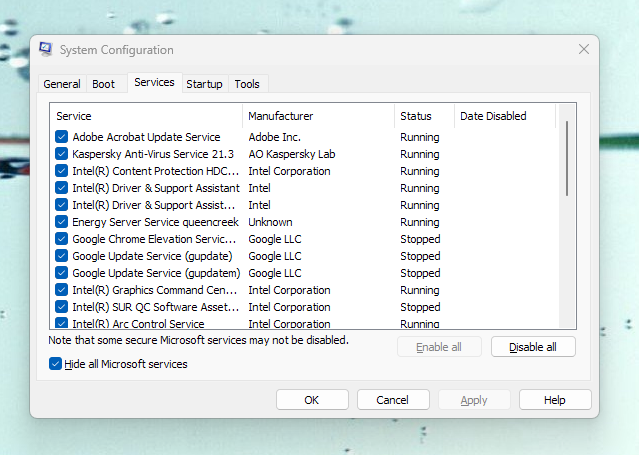
4. Clean boot Windows
Performing a clean boot will help you pinpoint what is causing the issue. The steps to do this are mentioned below.
Search for the System Configuration app from the Start menu. You can also look up ‘msconfig’ to do the same.
Click on the Services tab and then the option to hide all Microsoft services, which you will find at the bottom.
After that, click on ‘Disable all.’ This will uncheck all the boxes on the screen and click Apply.
After that, click on the Startup tab, and then Open Task Manager by clicking on the highlighted text. The list of applications that run at startup will appear when you boot up your computer.
You have to disable those which may be causing issues. Otherwise, you can also disable all of them if you are unsure. Tap on the application’s name, and you will see the option to disable it from opening on startup on the top.
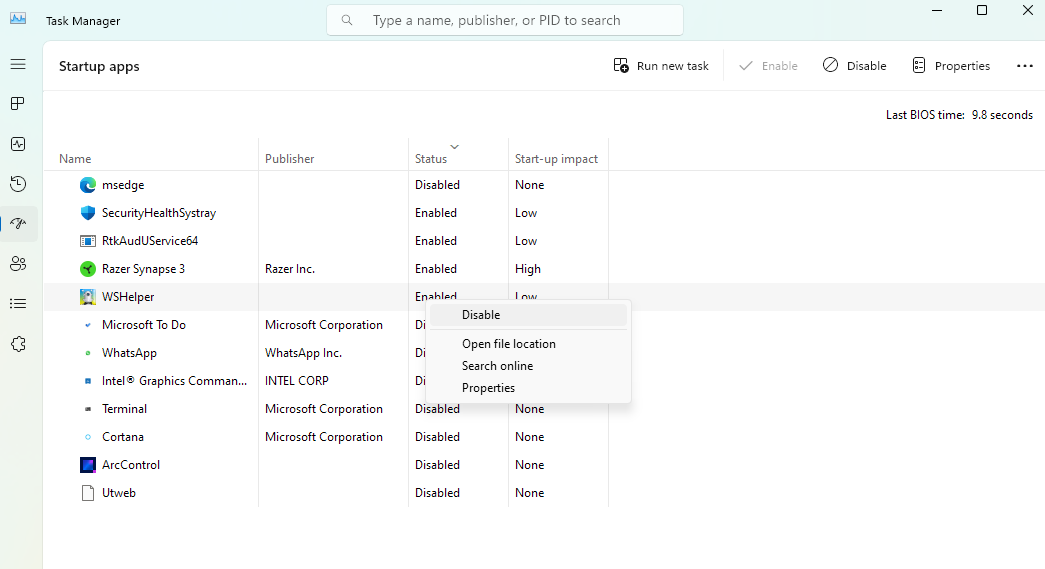
Close Task Manager and System Configuration after clicking OK at the bottom right. After doing all of this, restart your computer. Doing this will help you narrow down the possible causes of the issue and eventually find it.
Once you do, uninstall it and then try enabling Memory Integrity.
5. Use Registry Editor
Before you start, it is essential to note that Registry Editor is a potent Windows tool. You should create all necessary backups before starting and proceed with the steps at your own risk.
Open Registry Editor by searching for it from the Start menu. Alternatively, you can press the Windows and R keys simultaneously and type ‘regedit’ in the Run dialogue box that pops up. Confirm the action if prompted.
Now, on the left panel, head into the Computer section if you are not already. Double-tap on it or tap on the arrow beside the word Computer.
From the drop-down list, locate and enter the folder named ‘HKEY_LOCAL_MACHINESYSTEM’.
Now, double tap on the’ SYSTEM’ folder, then double press the ‘CurrentControlSet’ folder.
After that, enter the ‘Control’ folder. A long list of more folders will appear, out of which you have to enter the one named ‘DeviceGuard.’ Under there, go into the folder named ‘Scenarios’.
Finally, tap on ‘HypervisorEnforcedCodeIntegrity.’ Instead of doing this, you can also type the path mentioned below just under the taskbar of Registry Editor that you will find at the top.

Now, on the panel on the right, double-tap on Enabled. A new window will pop up. In the ‘Value data’ section, change the value from 0 to 1. Then click on OK and close all windows. Lastly, restart your computer.
What this method does is turn on the system functionality on which Memory Integrity is based. Try this after trying all the other methods detailed in this article. Although risky, it should resolve your issue, and you should finally be able to turn on Memory Integrity.