Recently, Apple introduced macOS Sonoma, which brings a lot of major features to macOS. One is widgets on the desktop, and then you can use your iPhone widgets on your Mac. This tightens the ecosystem further and enhances productivity. You also get a new lock screen, several new animations, and more.
The Developer Beta for macOS 14 (Sonoma) is out now to install. If you have a compatible MacBook (2018 and later MacBook Air or 2018 MacBook Pro and later), you can install the macOS Sonoma Beta right now. Sign up for a developer account at the official website and agree to the terms and conditions. You should see the Beta in your Settings app.
As always, installing Beta software comes with its own set of risks, and this is no different. Bugs like these that cause user data loss and break the experience are why we don’t endorse beta software on your primary device unless you’re a tester or developer. A recurring problem with macOS seems to be the recovery mode bug with Wi-Fi.
macOS Sonoma Wi-Fi issues
The way macOS updates work, your laptop should automatically restart once the update completes. If this unfortunate bug plagues your MacBook, it’ll first undergo the normal restart process. But instead of booting into the macOS Sonoma lock screen, it’ll bring up the macOS recovery mode. If this happens, something has mostly gone wrong with the system.
Since you’re updating to beta software, there’s a good chance you took a proper iCloud or Time Machine backup of all your data. If you didn’t, all your data is mostly lost unless you can unlock the Mac and get it past the recovery mode.
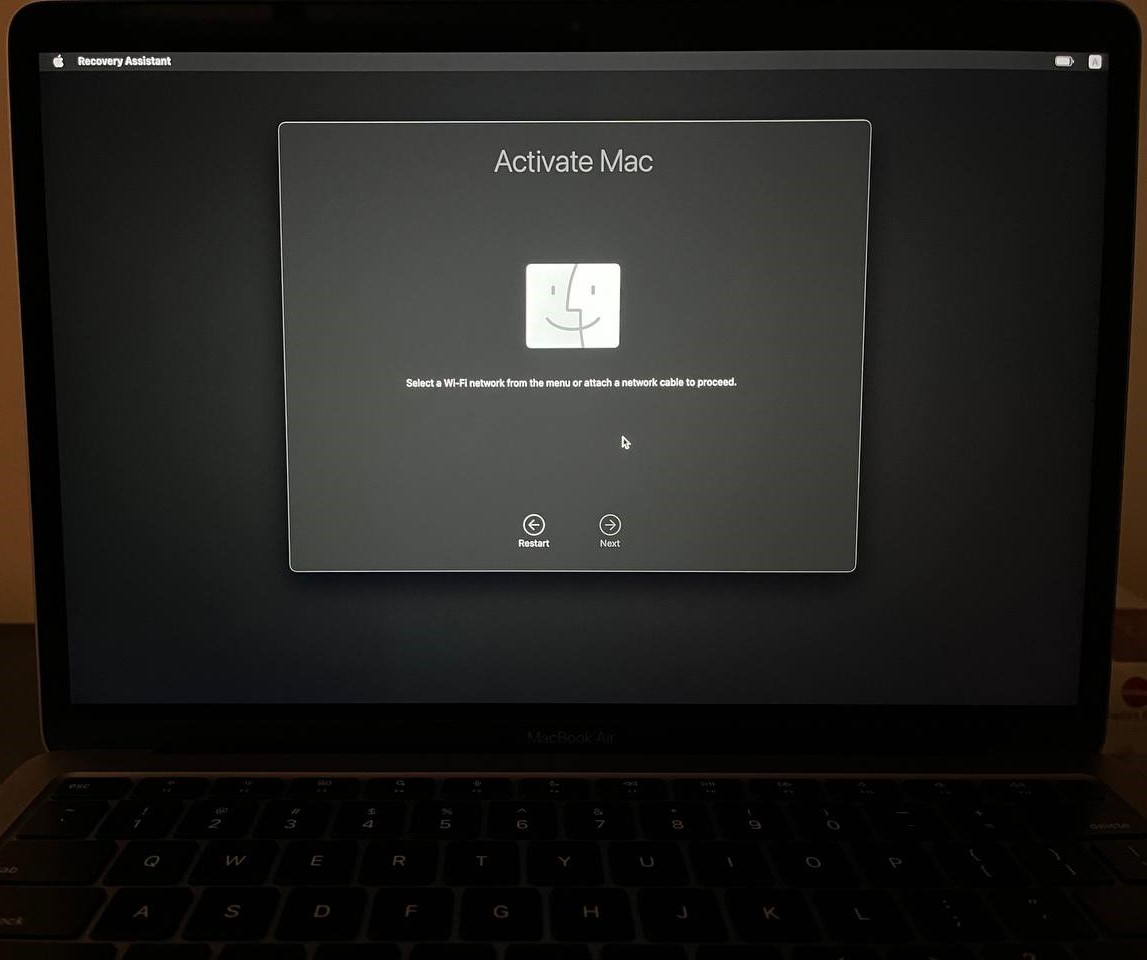
The main issue with recovery mode is that the system asks you to choose a Wi-Fi from the menu on the Activate Mac screen. However, the Wi-Fi menu does not show up. Instead, it displays only the keyboard input toggle at the top right and the battery icon. You can either shut down, restart, or erase the MacBook, but the Wi-Fi icon refuses to show up.
In some cases, shutting the laptop down and leaving it alone for a couple of hours does restore the Wi-Fi menu, but it hasn’t happened on our unit. If you have these Wi-Fi issues, you might want to attempt a couple of basic fixes, like restarting, before moving on to the longer methods. You can try restarting the device, connecting to your phone’s Hotspot, etc. If nothing helps, your first recovery option is to erase the MacBook entirely.
How to Fix macOS 14 Sonoma Wi-Fi Menu Not Showing Problem?
1: Erase MacBook
Warning: If you don’t have a backup with an external drive, iCloud, or Time Machine, you cannot retrieve your data after this complete reset.
- Navigate to the top left and select the recovery assistant option.
- You’ll see an option in the drop-down menu that says “Erase Mac.”
- It should take a few seconds to reboot, and the logo may flash multiple times. The time this takes depends on how much data is on the Mac.
- Once it reboots into the recovery screen, check the top right area to see if the Wi-Fi menu has reappeared.
- Connect to your Wi-Fi network or Hotspot, and reinstall macOS.
- Once macOS is installed, you can set it up normally.
2: Try Safe Mode
Disclaimer: If there’s no copy of macOS on your laptop and you have to reinstall it, this method will not work. Safe mode boots macOS without third-party apps or malware and is a diagnostic method for your OS. It’s a safe way to fix many software-based OS issues.
- Turn off the MacBook using the Shut Down option or press the power button.
- Press the power button again to turn it on.
- Your MacBook should now show the logo and the startup disk option.
- Immediately press and hold the Shift keys; you’ll eventually see a login window.
- It’ll ask you to enter the password you use to unlock this Mac, and it may ask you this twice to permit you to log in.
- Your MacBook is now in Safe Mode. Check the menu bar up top for the Wi-Fi indicator. If it’s there, connect to Wi-Fi and finish the rest of the setup.
3: Use an Ethernet Adapter
Most MacBooks do not come with a direct port to connect to Ethernet. If the Wi-Fi menu doesn’t show up, an adapter is one way to connect your MacBook to the internet. You have to first plug in the Ethernet end (Female end) to the laptop (male end) via the USB-C port. You won’t get the Wi-Fi menu back, but your Mac will directly use the internet from the router without needing to connect to Wi-Fi.
Reinstall macOS and complete the setup. Once that’s done, the Wi-Fi drivers should return to normal, and you should see the Wi-Fi menu up top.
4: Use Command+ R
- This is a pretty straightforward solution. First, completely turn off your MacBook.
- Press the Command and R keys together until the MacBook starts.
- Once the laptop reboots, you might get the Wi-Fi indicator back in the menu bar.
5: Revive or Restore using another MacBook
- On the other MacBook, please install the latest version of Apple Configurator and ensure it’s on macOS 12.4 or later. This MacBook also needs internet access. Ensure you turn off any firewall protections that block transmission between Apple’s servers since performing this Revive is necessary.
- You also need a USB Type C to Type C cable that supports power and data transfer. First, we’ll try reviving the laptop. We’ll perform a restart using a special key combination and then directly attempt the revive using Apple Configurator. We’ll move to Recovery if the Revive option doesn’t work since the second method is a bit longer.
- Open the Apple Configurator app and verify if your other MacBook is in connected devices.
Reviving a MacBook
- Connect both of the MacBooks using the USB-C cable. Ensure the MacBook with Apple Configurator is plugged into a main to retain power. It could take several hours, and power is essential for this process.
- Press the power button for a few seconds until the MacBook turns off completely.
- Press the right Shift key, the left Option key, and the left Control key together. It should display “DFU” on the other MacBook.
- In Apple Configurator, select the DFU icon of the MacBook that you want to revive.
- In the menu at the top, choose the Actions option. There, you’ll see an Advanced menu.
- Click no Revive device, and finalize this by clicking on Revive.
- Wait for the Revive process to complete. You can keep track of this with the progress, which you’ll see in the Apple Configurator app.
- An Apple logo will appear and disappear on the MacBook you’re trying to repair. This process could take very long, and the progress bar may not move much. This process took about 3 hours for us, so we recommend not unplugging or canceling if you notice slow progress.
- Once complete, your MacBook should reboot, and you’ll now see the Wi-Fi menu on the top.
- Connect to Wi-Fi and reinstall macOS. Continue setting up the laptop as usual.
Note: If the Revive was successful and you didn’t erase your MacBook earlier, your data still might be safe.
Unfortunately, the Revive process may be unsuccessful in some cases. You have to use recovery OS to reinstall macOS and take additional steps to recover the firmware.
Restoring the MacBook
- Open Apple Configurator, and click on the Actions button. Click on Restore.
- This process could take time, and wait for the Restore progress bar to complete. Your MacBook will automatically restart once this process is completed.
- Once the MacBook restarts, press Shift-Command-R at startup. This will perform a fresh install of macOS on your system. It might not be the latest version, but you’ll get the original version that came with your Mac.
- Now, you’ll see an option to reinstall macOS Ventura. Reinstall the software after connecting to Wi-Fi, and continue the setup as usual.
6: Contact Apple Support
You can visit Apple’s service center near you or contact Apple Support. They’ll generate a Case ID if they cannot resolve your problem. Show this case ID at an authorized service center, and you’ll mostly get a solution for free. They’ll probably plug it into an ethernet or restore it manually.
Conclusion
These are the various methods you can use to restore your MacBook. Note that these steps will revert you to a stable version of macOS Ventura. If you want to download the macOS Sonoma beta again, you’ll have to go to System Settings, manually update to the Beta once again, and hope the bug doesn’t repeat this time.