
Nowadays, wireless internet connections are becoming more common everywhere. We are all entirely dependent on wireless internet connections. It’s becoming a vital part of our daily lives. In this world, any device can access a wireless internet connection.
Wireless internet connections give us many advantages. But, sometimes, you get unexpected errors, such as 2.4GHz Wi-Fi Not Working. Several users have been reporting this issue. They complain that 5GHz is working, but Wi-Fi stops working when they switch to 2.4GHz.
What are 2.4GHz and 5GHz?
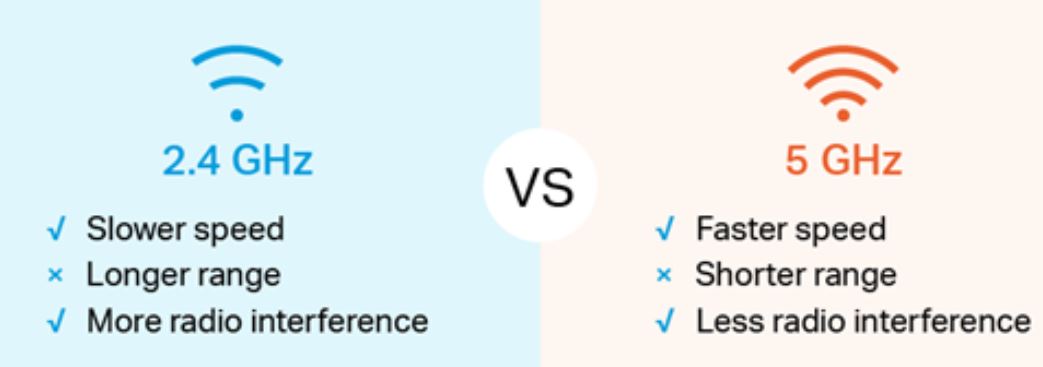
Generally, Wi-Fi operates on two frequencies. One is 2.4GHz, and the other is 5GHz. The majority of users adopted the first one, which is 2.4GHz. On the other hand, the 5GHz increased the quality of the connectivity and delivered a much better data transfer speed. Users using 5GHz technology will surely experience a faster internet connection than 2.4GHz.
The 2.4GHz and 5GHz bands were designed to work together to give the best possible internet performance. The main differences are in coverage and quickness.
A 2.4GHz connection can travel long-range but at low speed. On the other hand, a 5GHz connection provides faster speed over a shorter range. In other words, 2.4GHz has lower frequencies with ample coverage, and 5GHz has higher frequencies with less coverage.
12 Ways for Fixing 2.4GHz Wi-Fi Not Working But 5GHz Works
- Restart your Router
- Check for Firmware Updates
- Change the Wi-Fi Mode
- Check for MAC Address Filtering
- Disable 5GHz Temporarily
- Restart the Connections
- Change the Channel Once
- Reset Router to Factory Settings
- Separate SSIDs for 2.4GHz and 5GHz
- Check Router Placement
- Check for Interference
- Go to Customer Service
Fix 1: Restart your Router
This is the primary step you should try first. Restarting the router device can fix many network-related problems that are happening to your device. So, this step might also solve the 2.4GHz Wi-Fi Not Working error.
- Turn off your router.
- Wait for a few minutes.
- Give yourself enough time to allow your router to shut down entirely.
- After some time, turn on the router and check whether the issue is still there.
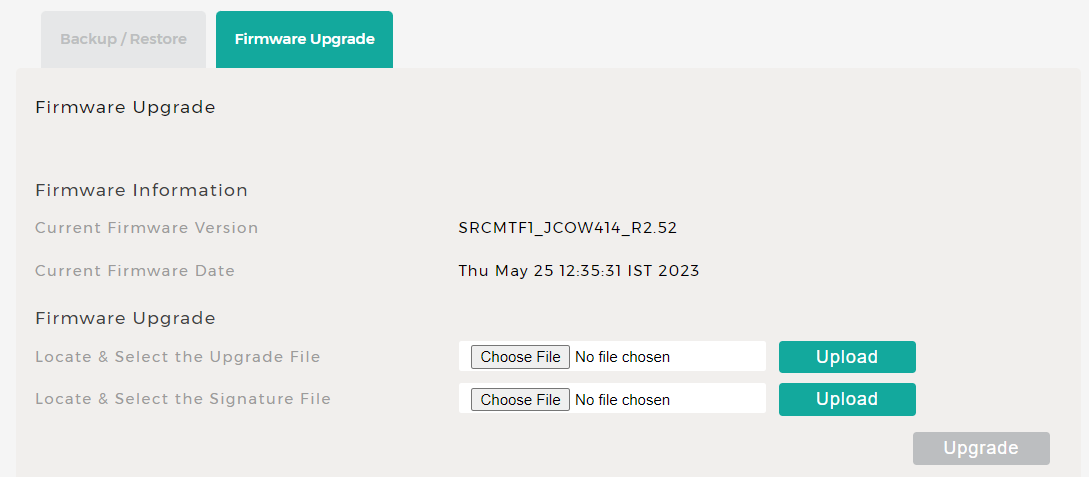
Fix 2: Check for Firmware Updates
You have to make sure that your router is entirely up to date. So, due to outdated versions, many problems might occur on your device. The problem might also come from this reason if your router firmware is not updated.
In routers, manufacturers have the option of releasing updates for the device. So, download and install new updates to avoid any errors.
Keep in mind that the updates should be developed by the manufacturer only. Download the firmware updates from the official manufacturer’s web pages. Most modern routers allow you to install the updates over the air. Follow the steps below:
- Open a web browser and enter your router’s IP address in the address bar. This is usually written on the back of your router (192.168.1.1 or 192.168.0.1).
- Enter the username and password provided by your ISP.
- Go to the router’s settings page from here.
- Now, click on Firmware Updates.
- Install any firmware updates that are available. Your router will restart automatically.
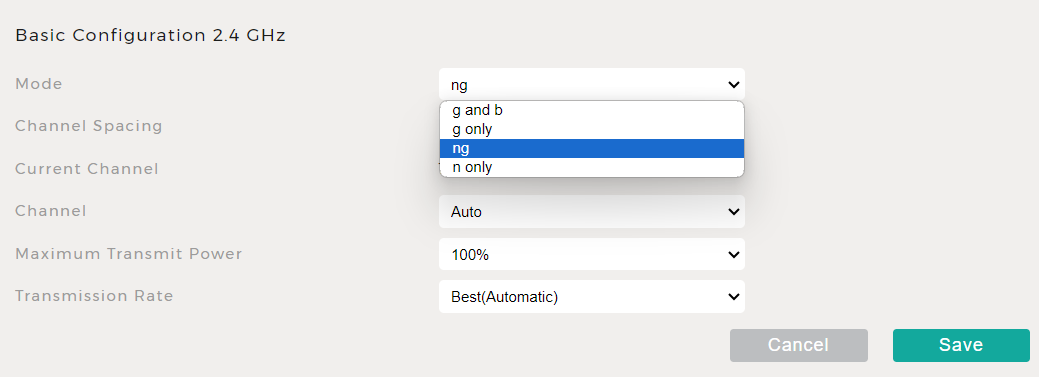
Fix 3: Change the Wi-Fi Mode
This could be another reason for this problem. Yes, Wi-Fi mode could be the culprit. You sometimes need to change the Wi-Fi mode on most devices, such as smartphones, PCs, tablets, etc.
- Navigate to the router interface.
- Now, find the Wi-Fi options.
- After that, select your desired mode.
- Once done with all processes, check the error.
Fix 4: Check for MAC Address Filtering
If a computer or other device doesn’t have a valid MAC address, then it won’t be able to connect to the network. If 5GHz Wi-Fi is working but 2.4GHz is not, MAC address filtering may be to blame.
- Open a web browser and enter your router’s IP address in the address bar. This is usually written on the back of your router (192.168.1.1 or 192.168.0.1).
- Enter the username and password provided by your ISP.
- Go to the router’s settings page from here.
- Find the MAC address-filtering section. Depending on your router, you’ll find it under either the Wireless or Security menus.
- Verify the filtering status to see if MAC address filtering is active. It may be stopping your device from joining the 2.4GHz network if you have it enabled and set.
- Simply disable MAC filtering to test connectivity.
- Click the Save Changes button to save your new MAC Address Filtering preferences.
To rejoin Wi-Fi, first, forget the 2.4GHz Wi-Fi network from your device’s list of available networks. See to it that it successfully connects immediately.
Fix 5: Disable 5GHz Temporarily
You can also try temporarily disconnecting the 5GHz Wi-Fi network to see if that helps fix the issue. Here’s how to do this easily:
- Go to the router’s settings page.
- To turn off the 5GHz network, look for the appropriate menu item. The names “Wireless Band,” “Dual Band,” or anything similar should be there.
- After testing, if necessary, re-enable the 5GHz network and check that both networks are operating normally.
Fix 6: Reset Network Connection
Due to poorly established network connections, many network issues might appear. Some users have reported that they faced the issue due to poor network connection.
Sometimes, the router attempts to connect more devices for a fast network. In that case, some unexpected problems might occur. So, make sure to reset your network connection. To reset your network connection, you simply want to toggle the Airplane mode on and off.
Fix 7: Change the Channel Once
The 2.4GHz and 5GHz both have different channels. There are only 11 channels available on the 2.4GHz band, as it provides ample coverage. On the other hand, the 5GHz has more channels than the 2.4GHz connection, as it is faster and is preferred for short distances.
Sometimes, your chosen channel might have problems due to heavy traffic. So, switching to another channel can improve performance without any error problems. Thus, the problem might be solved by this method.
Fix 8: Reset Router to Factory Settings
If you’re having complicated problems with your Wi-Fi network, try resetting your router to its factory settings. Please be aware that doing so will completely reset your network settings, including any saved configurations. Make sure you have a backup of any necessary configurations.
- Press and hold the reset button on your router for a few seconds.
- Once the lights on the router start blinking, this means that your router has been reset.
- Restart your router and reconfigure it after it has been reset.
- You may need to use the login details provided on the back of your router.
- Make sure that both the 2.4GHz and 5GHz networks are working properly by doing a series of connectivity tests on each.
You can also reset your router to factory settings through the router’s web interface.

Fix 9: Separate SSIDs for 2.4GHz and 5GHz.
If you’re having issues with your Wi-Fi connection, try configuring two separate SSIDs (Service Set Identifiers) for your 2.4GHz and 5GHz networks. Here’s the procedure:
- Open a web browser and enter your router’s IP address in the address bar. This is usually written on the back of your router (192.168.1.1 or 192.168.0.1).
- Enter the username and password provided by your ISP.
- Go to the router’s settings page from here.
- Find the option to enable unique SSIDs for the 2.4GHz and 5GHz networks and activate it. This option is usually named “SSID Broadcast” or “Wireless Network Name.”
- Give the 2.4GHz and 5GHz networks unique names (SSIDs). Make it so they stand out to the user.
- Do not forget to save your settings after making any modifications.
Fix 10: Check Router Placement
The performance of your wireless network is heavily dependent on the placement of your router. Incorrect installation might lead to dead zones and signal dropouts. Put the router in the middle of your house or workplace, as this is where the signal will be strongest.
Increased Wi-Fi coverage is the result of amplified and dispersed signals in all directions. Having the router in a highly visible location is essential. If you put it on a higher shelf or install it higher on the wall, the signal will travel farther.
Clear the area around the router of any potential obstructions, such as furniture or walls. The strength of your Wi-Fi connection may decrease if you use these. The router must operate free from interference from any other electrical devices. Your Wi-Fi signal can suffer if you use one of these devices.
Vertical and reasonably angled placement of your router’s antenna will allow it to cover a wider range horizontally and vertically. Find out how strong the signal is from different rooms in your house by using a Wi-Fi analyzer app on your mobile device or computer. If your router’s signal is weak, you can try relocating it.
Wi-Fi extenders and mesh Wi-Fi systems are two options to consider if you need to cover a large area or have places with poor signal strength. Regularly check and adjust the Wi-Fi signal strength and connectivity in any home or office room. If you move the router, you can see whether it fixes the dead places.
Fix 11: Check for Interference
Wi-Fi connections are notoriously vulnerable to wireless interference. Improving your Wi-Fi’s performance can be as simple as pinpointing the interference sources and eliminating them. To avoid any interference, follow these steps:
- Find potential interference sources such as nearby Wi-Fi networks, electronic devices, and home appliances.
- Access your router’s configuration page and select a less crowded Wi-Fi channel if you’re experiencing connectivity issues.
- Choose Wi-Fi channels that won’t conflict with those of nearby networks to avoid interference. For 2.4 GHz, the most commonly suggested channels are 1, 6, and 11.
- Consider a hardware upgrade to a router that is compatible with current Wi-Fi standards and has enhanced interference management capabilities.
- Don’t use any VPN or ad-blocking software that could interfere with your network connectivity, especially on the slower 2.4 GHz band.
If interference continues, it may be time to call in the big guns and have a professional examine the situation and help you figure out how to fix it.
Fix 12: Go to Customer Service
You should contact your customer support team if all the above steps don’t work. That’s the last thing you can do to solve the error. There might be some physical problem with your router. The professionals would do their best to solve the 2.4GHz Wi-Fi can not connect error. Their specialists should handle the error.
- If the LOS light on your router is blinking red, read this guide to learn how to fix the problem.
Maribel B. CANCEJO
our 2.4 GHz is no signal