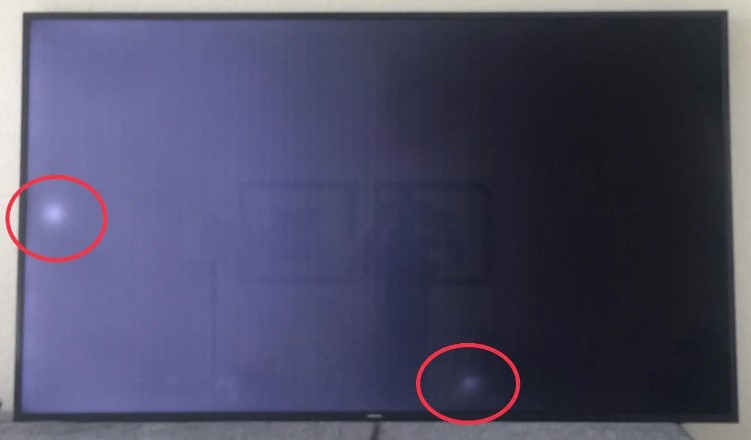
White spots on Samsung TVs are a common problem that can be very distracting. These annoying bright spots tend to pop up on the screen no matter what is being shown, drastically lowering the overall quality of the image. It is crucial to know what triggers these annoying white spots and, more importantly, how to fix them.
This article will discuss five ways that have been effective in dealing with this issue. Even individuals with basic technical knowledge may fix the problem by following these detailed steps, and the annoying white spots will be a thing of the past. Let’s get started.
Why Do White Dots Appear On My Samsung TV?
Understanding the root of the problem is essential to finding a workable solution. If you know why your TV screen shows white dots, you can fix the issue and get your TV back to normal. The following are some of the reasons why white dots appear on your TV:
The detachment of fuser lenses is the primary culprit, as these lenses disperse the LED illumination on the screen. Not having the light appropriately diffused by the fuser lenses causes glaring white spots on the screen.
Other reasons why white dots appear on TV screens could be:
- A complete breakdown of the LED strip.
- Lack of proper color or brightness reproduction due to dead pixels.
- Bugs in the software cause the white dots to appear on the screen.
How to Fix White Spots on Samsung TV?
Now that you have understood the primary reasons behind the white spots on your Samsung TV let’s dive into the troubleshooting steps. Follow these troubleshooting steps, and you can eliminate the white spots on your TV in no time!
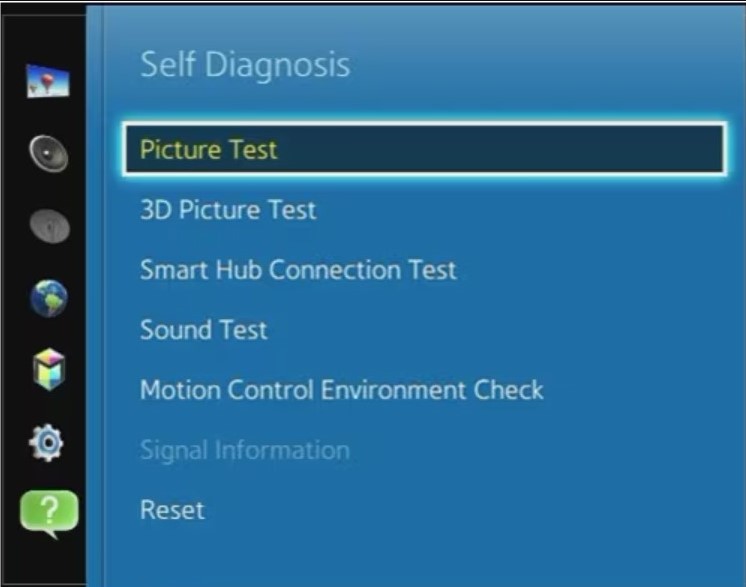
Fix 1: Perform a Picture Test
You can use a picture test to determine how severe the white spots on your Samsung TV are. The TV’s setup menu is where you’ll find this feature, showing you just how serious the issue is. Here’s how to set up a picture test:
- Press the Menu button on your Samsung TV remote.
- Use the remote’s navigation/arrow buttons to reach the Settings menu.
- Choose “Support” from the settings menu.
- Please navigate to the Self Diagnosis option and select it.
- Select the Picture Test submenu item from the Self Diagnosis menu.
After selecting “Picture Test,” you can experiment with various color schemes to see how they affect the visibility of white areas. It’s worth noting that brighter colors on the screen, like blue, white, or yellow, can make white spots stand out more. Conversely, the white spots may be difficult to identify while viewing dark or gloomy images.
You can tell if the problem is with the fuser lenses or the reflectors by seeing how severe the white spots are when running the picture test. Try shaking or tilting your TV a bit to the side and see if you hear a rattling sound. If you hear a rattling sound, the reflectors are detached.
You can use this information to decide whether to attempt repairs or contact an expert. If you are ready to repair yourself, move on to the next solution.
Fix 2: Attaching the Fuser Lenses Back
If you have determined that the reflectors/fuser lenses are to blame for the white spots on your Samsung TV, you can proceed with re-attaching them. It’s crucial to take all necessary safety measures and consider the warranty situation before beginning this repair. As you might know, repairing your TV yourself or at an unauthorized Samsung service center will void its warranty. Here is an in-depth guide on how to disassemble and fix your TV:
Part 1: Preparation
- Gather the necessary tools, such as a spatula and screwdrivers.
- Find a flat surface to lay the TV on.
Part 2: Disassemble your Samsung TV
- To begin, disconnect the TV from its power source and all other wires (including the HDMI cable).
- Remove the TV’s back panel by gently unscrewing its screws. Remember that screws are small and easily misplaced.
- You’ll need to lift the display panel up and away from the TV after you’ve taken off the rear panel. You can carefully pry them apart with a putty knife, spatula, or ruler. Avoid breaking the parts by not applying too much force.
- Look for the TV’s ribbon cables near its base. These wires run from the central processing unit to the TV screen. Carefully take the ribbon cable out while tilting it.
- Remove the plastic frame protecting the reflector sheet after you cut the ribbon cable. To reassemble the panel later, you should first note its left, right, top, and bottom places.
- Carefully lift the plastic frame, working around the TV to protect the reflector sheet from underneath. Make sure to handle the plastic frame with extreme caution.
- You can easily raise the white cover with the plastic support structure out of the way.
Part 3: Re-attach the Fuser Lenses
- Fuser lenses that have become loose need to be re-attached. Put all the detected fuser lenses in a secure place. Examine each lens to find the ones that are about to break.
- First, use a toothpick to spread glue on the back of each fuser lens on a paper or plastic sheet. Be sure you use just enough adhesive to keep them in place. Make sure to use transparent adhesive or the one recommended in the manual. Using the wrong glue or adhesive can have severe consequences.
- Replace each fuser lens, ensuring the three prongs line up with the LED. Do this with all the broken fuser lenses.
- Now, wait an hour or two to ensure the glue has dried before proceeding.
Part 4: Reassemble your Samsung TV
- After the fuser lenses have dried completely, you can put the TV back together.
- Put the white sheet back where it belongs, ensuring its level by referencing the marks you made previously.
- Reinstall the plastic frame and press firmly to secure it.
- Next, carefully position the TV screen inside the frame, ensuring all sides and corners meet.
- To make sure it fits snugly, run your fingers over the edges.
- Reassemble the device by reconnecting the ribbon cable and pressing the sides to secure it.
- Verify that the clicking noises you used to hear while pressing the bezel are no longer there.
- Lastly, ensure the back panel is in the right spot and lined up with the screw holes. Put all the screws back in their holes with the help of the screwdriver.
Part 5: Turn On the TV
- Plug in the power supply, the HDMI cable, and other components.
- Use the remote or press the power button to turn on the TV and see if the white spots still appear.
- You can also perform the picture test again to see if the white spots still appear.
When you re-attach the fuser lenses in this way, the white spots on your Samsung TV screen should disappear. If you’re not confident in your ability to fix the TV on your own or if the TV is still under warranty, please proceed with caution and consider contacting Samsung support for assistance.
Fix 3: Replace the Entire Backlight Array or LED Strips
If the fuser lenses seem in place, you might want to check out the entire backlight array of the LED strips. It may be required to replace the whole backlight array or LED strips if your TV is too old, and so are the LED strips.
Remember that re-attaching the dislodged diffuser lenses is only a temporary repair, and these might detach again if the LED strip is too old. Seeing brown spots under the lenses indicates a failing LED array that needs prompt replacement. However, if you haven’t watched TV in a while, this probably isn’t the case, and the solutions above should work fine.
If the LED strips have failed, you can replace them with new ones, which cost around $50 each. This price can be higher or lower, depending on your TV model.
If you’re not confident in replacing the backlight array or LED strips without damaging your TV, you should consider hiring a professional. If you are sure, follow the steps below:
Part 1: Preparation
- Gather the necessary tools, such as a spatula and screwdrivers.
- Find a flat surface to lay the TV on.
Part 2: Disassemble your Samsung TV
- To begin, disconnect the TV from its power source and all other wires (including the HDMI cable).
- Remove the TV’s back panel by unscrewing its screws gently. Remember that screws are small and easily misplaced.
- You’ll need to lift the display panel up and away from the TV after you’ve taken off the rear panel. You can carefully pry them apart with a putty knife, spatula, or ruler. Avoid breaking the parts by not applying too much force.
- Look for the TV’s ribbon cables near its base. These wires run from the central processing unit to the TV screen. Carefully take the ribbon cable out while tilting it.
- Remove the plastic frame protecting the reflector sheet after you cut the ribbon cable. To reassemble the panel later, you should first note its left, right, top, and bottom places.
- Carefully lift the plastic frame, working around the TV to protect the reflector sheet from underneath. Make sure to handle the plastic frame with extreme caution.
- You can easily raise the white cover with the plastic support structure out of the way.
- Take note of the burned plexiglass frame and the stress cracks.
- Flip the burned part of the plexiglass to the top.
Part 3: Replace the LED Strip
- Locate the LED strip and remove it by pushing down on the clip and pulling it straight up.
- Use the flat-tip screwdriver to pry the LED light bar off.
- Compare the old LED strip to the new one and make sure they match.
- Please insert the new LED strip, ensuring the notches align and push down to secure it.
Part 4: Reassemble your Samsung TV
- After installing the new LED strips, you can put the TV back together.
- Put the white sheet back where it belongs, ensuring its level by referencing the marks you made previously.
- Reinstall the plastic frame and press firmly to secure it.
- Next, carefully position the TV screen inside the frame, ensuring all sides and corners meet.
- To make sure it fits snugly, run your fingers over the edges.
- Reassemble the device by reconnecting the ribbon cable and pressing the sides to secure it.
- Verify that the clicking noises you used to hear while pressing the bezel are no longer there.
- Lastly, ensure the back panel is in the right spot and lined up with the screw holes. Put all the screws back in their holes with the help of the screwdriver.
Part 5: Turn On the TV
- Plug in the power supply, the HDMI cable, and other components.
- Use the remote or press the power button to turn on the TV and see if the white spots still appear.
- You can also perform the picture test again to see if the white spots still appear.
Fix 5: Fix Software Issues
The issue doesn’t need to be always hardware-related; it can also be due to a software issue. So, before you send your TV in for repair, make sure to try the following software solutions as well:
- Power Cycle your TV: Unplug the TV and replug it after 2-3 minutes to eliminate any software glitches causing the issue.
- Check the HDMI Connections: White spots could appear if your HDMI connections are faulty. Double-check the HDMI cable, port, and pins to make sure everything is fine. Ensure you have selected the correct input (HDMI 1. HDMI 2. etc.).
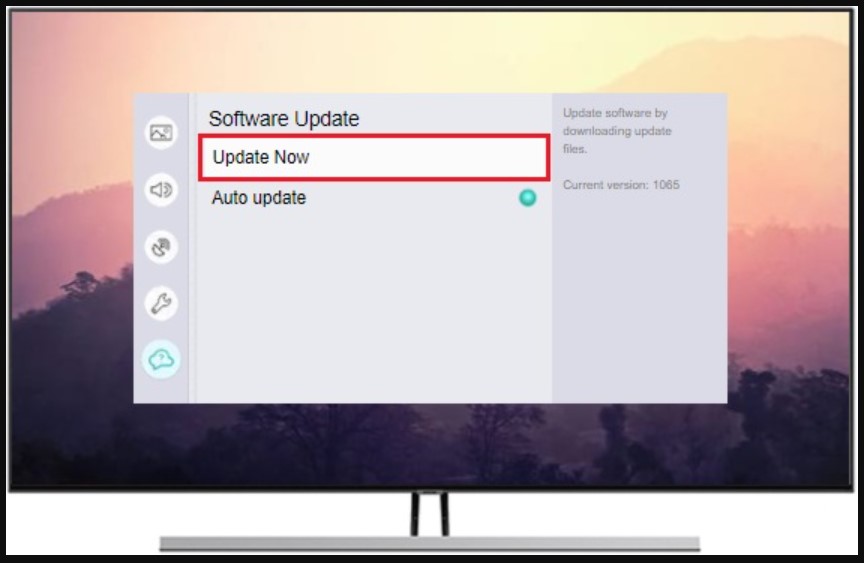
- Update TV’s Software: Ensure your TV is running on the latest software version available to avoid any issues.
- Try a Factory Reset: If any misconfigurations are causing the issue, a factory reset should help fix the problem. You can factory reset your TV by going to Settings > General & Privacy > Factory Reset > Reset.
Fix 5: Check for Defective or Hot Pixels
If your Samsung TV has defective or hot pixels, this could also cause bright or white spots on the screen. In this case, you can try the following solutions.
- Wait for some time: If you want to test if the pixel goes away in some time, leave the TV on for a while. Assuming it works at all, the time it could take is unknown.
- Rub the pixel gently with a damp cloth or a soft, pointed object such as rubber or an eraser. Avoid applying too much pressure to the pixel or the screen in general.
If the above solutions do not eliminate the defective or hot pixels, your TV likely has a hardware issue that must be fixed. You can contact Samsung support for further assistance.
Contact Samsung Support
Finally, once you have tried everything mentioned in this guide and are still facing the issue, you should contact Samsung support for further assistance.
Also, if your TV is under warranty, it is best to avoid repairing it yourself. Please take it to a Samsung service center and get it fixed there.

If your TV isn’t under warranty, taking it to the service center is still recommended if you are not confident enough to repair it yourself. Lastly, let us know in the comments section below if you have further questions.