People who want to control every aspect of their smartphone root their devices. However, the rooting became difficult after the arrival of Android 11. But now, you don’t need to lose your root access if your device is running on the latest Android 11. The reason behind this is Magisk. Magisk, in its recent canary build, now supports Android 11. Android 11 does come with a host of new features, and if you don’t want to lose your root access with this new Android version, then your only option, for now, is Magisk.
Rooting a phone does come with its cons, though. If anything goes wrong, then your device will get soft-bricked. But if you are careful, then you won’t mess up. For rooting a smartphone, you need three things: Access to a Windows, Linux, or Mac computer; an Android phone with an unlockable bootloader; and a USB cable to connect your phone to your PC.
Steps to Root Android 11 With Magisk Manager
-
Unlock Bootloader
The first thing you need to do to root your Android 11 phone is to unlock the bootloader. Remember, though, unlocking the bootloader will wipe everything from your phone. So before you unlock the bootloader, keep a backup of everything on your phone on a computer or in the cloud. Unlocking the bootloader is tricky, and it involves a lot of steps. Do a Google search on how to unlock the bootloader on your device and follow the steps properly to avoid bricking your phone.
-
Download Android 11 Factory Image
A factory image is a file that contains all the OS files and partition information. These files are fresh software installation files, and they are used to install fresh firmware onto a smartphone. Most smartphone manufacturers that have the Android 11 in its beta form have this factory image file on their website. So go to your smartphone manufacturer’s website and download the Android 11 firmware or factory image file. It will probably be a .zip file with a boot.img compressed inside it.
-
Move the boot.img to the internal storage
Now, after downloading the zip file, extract it using any program that performs extraction and compression. Then, move the extracted boot.img file to the internal storage on your smartphone. You can store it in any directory of your choice.
-
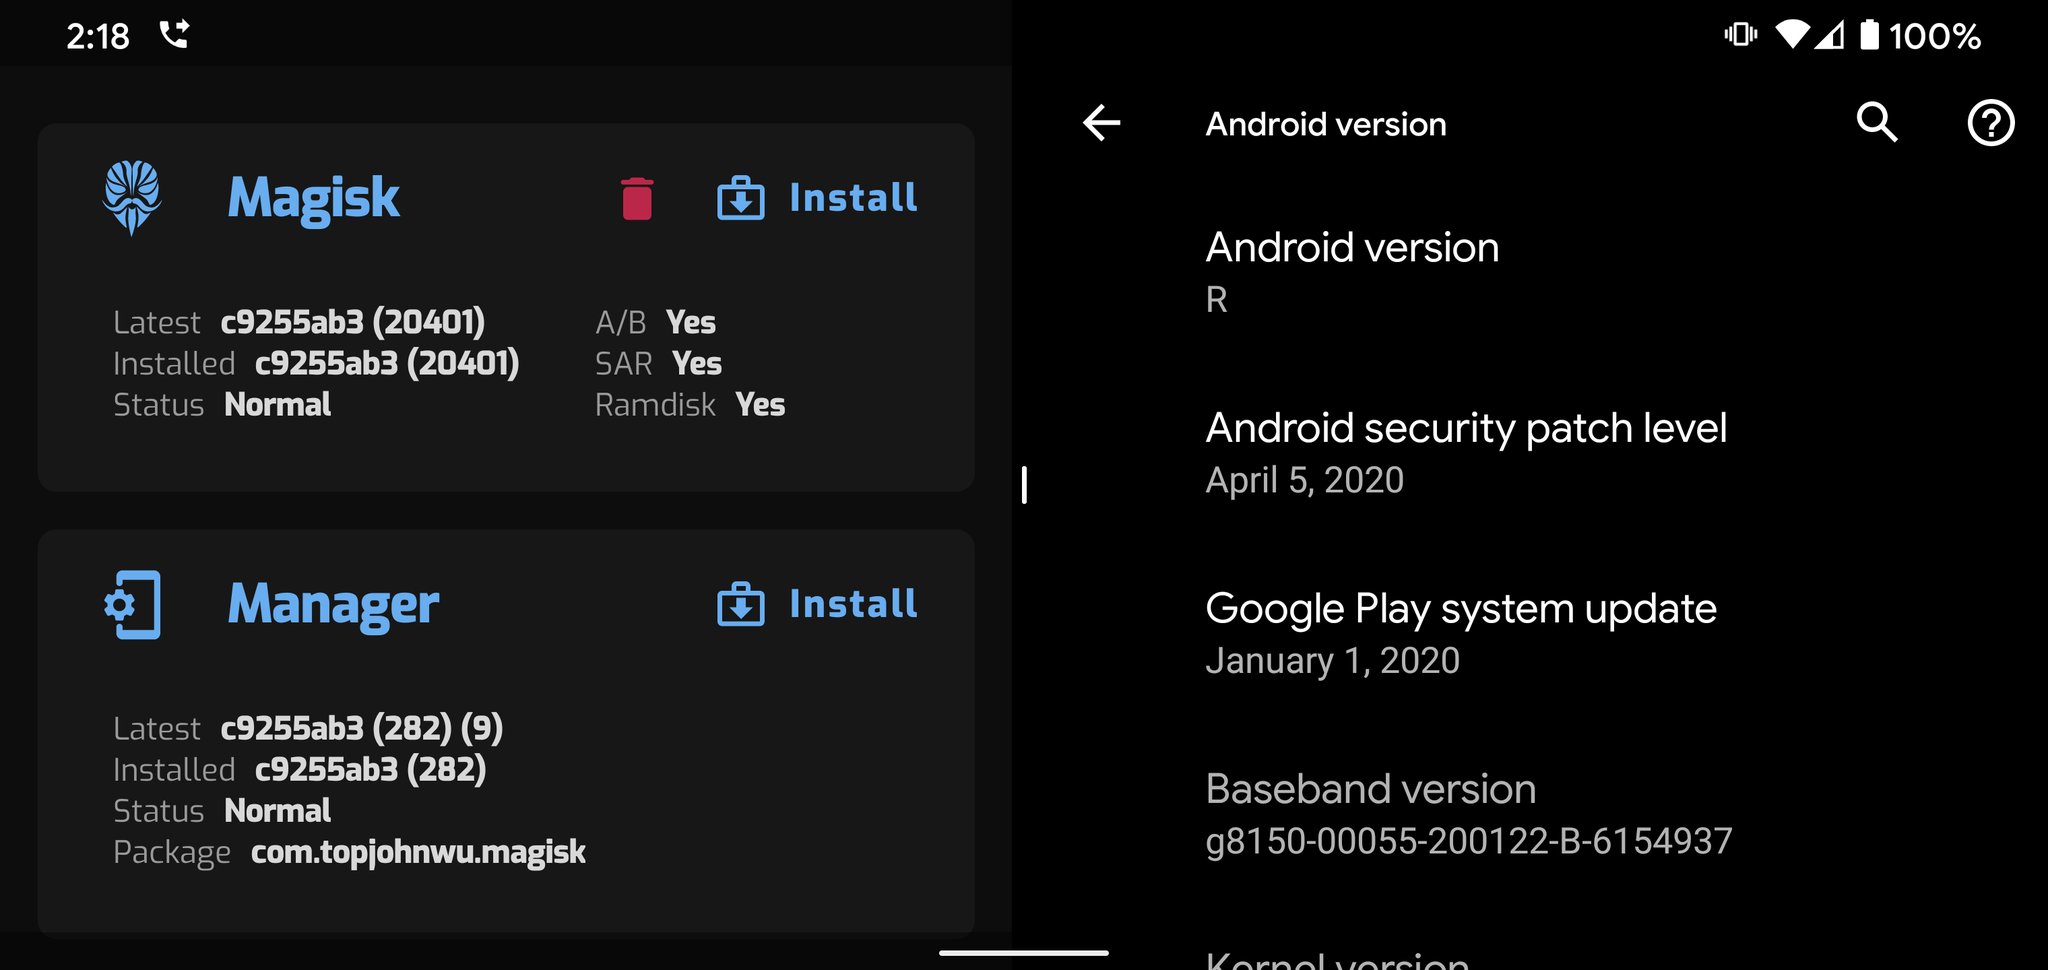
Install Magisk Manager (Canary)
Currently, Android 11 root is available only in the canary (pre-beta) version of Magisk Manager. So download the apk file from here and then install it on your phone. You will need to enable the install from unknown sources setting on your phone to install this app, though.
-
Patch the Boot Image using the Magisk Manager
Launch the Magisk Manager and then tap on the install button on top. You will see a pop-up asking for storage permissions. Allow it, and then on the next screen, you will see three options. Enable the two options that start with “Preserve” and make sure the “Recovery Mode” option is not selected. Then tap on Next, and on the next screen, choose the option “Select and Patch a file”. Then, a file explorer will open up. Here, navigate to the location on your phone where you have saved the boot.img file. After selecting the file, tap on “Next” and then finally tap on “Let’s go”. Your installation process will begin, and once it is complete, you will see a message on your screen that reads “All done”
-
Transfer the Patched Boot Image to your Computer
You will find a patched boot file in the same location where you previously stored the boot.img file. It will have the name “magisk_patched.img.” Move that file over from your phone’s internal storage to your computer using the USB cable.
-
Download & Setup Google’s Platform-Tools
Now, you must download Google’s platform tools to perform root on your phone. Depending on the OS on your computer, download the file for Windows, Linux, or Mac. This will also be a .zip file. Extract it and save it in any location on your computer. The extracted folder will have the name “platform-tools.”
If you are a Windows user, then open the platform-tools folder, and while pressing the Shift key, right-click on the empty space. Choose the option Open Command window, then. If you are a Linux or Mac user, then simply open the terminal.
In the terminal or command prompt window, enter the following command:
cd “platform-tools location”
Here, the platform-tools location will have the location of the folder where you have extracted the Google platform-tools folder. In case you have it on your desktop in your Windows system, then the command will be cd C:\Users\User\Desktop\platform-tools.
-
Switch to Bootloader Mode
Connect your phone to your PC, and then on your phone, go to settings>Developer options>USB Debugging. Here, turn on this setting if it was not already on in the first place. Then go to your computer, and in the cmd window or in the terminal, enter the following command:
adb reboot-bootloader
This will boot your phone into the bootloader mode.
-
Flash the Patched Boot Image file
Now enter the following command and press Enter:
fastboot devices
If you see your device here, then the process so far is successful. Then enter the command:
fastboot flash boot “patched_magisk.img file location”
For the “patched_magisk.img file location” part, simply drag and drop the patched_magisk.img file to the command prompt or terminal window. Then it will look something like this.
fastboot flash boot patched_magisk.img
If you are on Linux or Mac, you might have to put “./” before the command, too.
After that process is complete, enter the command:
fastboot reboot
And that is it. Your phone will now reboot, and you will have a rooted Android 11 phone. Just remember to press Enter after you enter each of these commands.


Blueswerks
Pixel 3a XL Android 11
Slight problem. Root is enabled first boot into OS, but does not stay after reboot. Have to fastboot boot magisk_patched.img again to enable root. This was done with Magisk Canary.
Blueswerks
Solved! Long story short, Xubuntu 16.04 LTS fastboot version does not support the commands needed for Android.. I found the version needed at Highonandroid.com. He has a fastboot.zip with Linux, Mac and Windows versions in the file.